Connecting to a database
Step 1 - Create the database
First create a new database:
CREATE DATABASE InternalsViewerTutorial
GO

USE InternalsViewerTutorial
GO
Connect to this database in Internals Viewer:
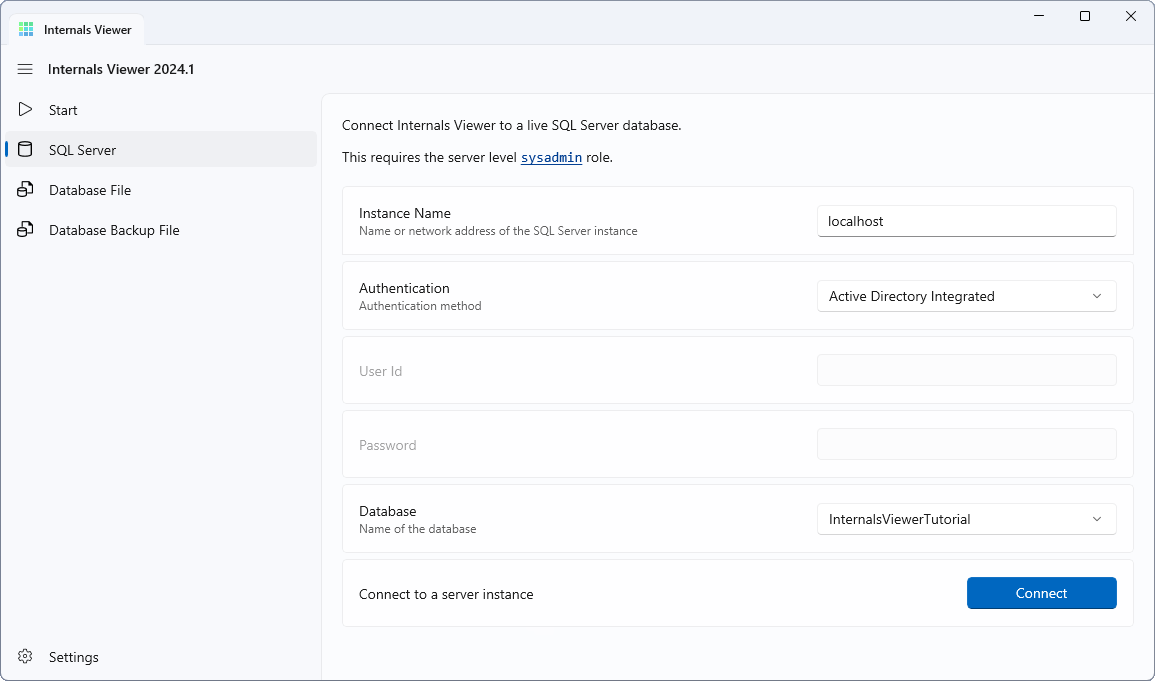
When connected the database will be empty.
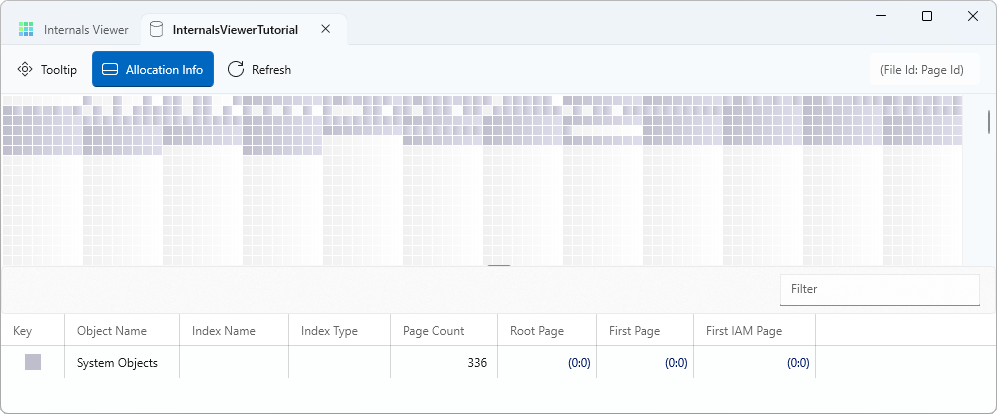
All of the allocations so far are system object that SQL Server uses to manage the database. These are the same objects Internal Viewer reads for information about the database.
Step 2 - Add a table
Next we'll create a table. This table will be a heap meaning it does not have a clustered index.
CREATE TABLE dbo.HeapTable
(
    NumberField    INT          NOT NULL
   ,TextField      VARCHAR(100) NOT NULL
   ,FixedTextField CHAR(10)     NOT NULL
)
GO
Refresh the database with the Refresh button.

There will be no changes to the database so far as no data has been inserted and the allocations for this table haven't started.
Step 3 - Insert data
Add data with the following SQL:
INSERT INTO dbo.HeapTable VALUES
    (100, 'This is the first row',      'Row 1')
   ,(200, 'And this is the second row', 'Row 2')
Refresh the databases with the Refresh button and Internals Viewer will show where the table data has been stored:

This shows an extent (8 pages) has been allocated to the table:

Each page is 8 KB (8192 bytes), so this extent covers 64 KB.
SQL Server uses to begin allocations with up to eight single pages. Since SQL Server 2016 the MIXED_PAGE_ALLOCATION database options is off by default meaning it does not use single page allocations and extents are uniform, i.e. belonging to the same object.
If you toggle the Tooltip button and put the cursor over the extent it will tell you the Page and Extent number and the allocated object

NOTE
The allocation status of each page is tracked by PFS (Page Free Space) pages. The PFS would show that only the first page of the extent is allocated.
The PFS can be added to the allocation map by toggling the PFS toolbar button.
Step 4 - Finding the data
There are a couple of ways to view the data.
The Allocation Info table includes entry points to an object.

TIP
Pages are addressed by File Id giving the database file the page is in, and Page Id, giving the page index. The physical location in the file is Page Id * 8192 bytes.
Page Address in Internals Viewer is formatted as (File Id:Page Id). If you see it in this format in the application you can click on it to open that page.
An address can also include a slot formatted as (File Id:Page Id:Slot Id), this gives a pointer to a particular record in a page. It is the format RID (Row Identifier) pointers take.
Root Page is the start point of an index. B-Tree indexes go from the root page to the leaf pages.
As this table is a heap (no clustered index) there is no index structure the page address of File 0, Page 0 means an empty value.
First Page is where the table data starts. We'll see later how this first page leads to the other pages.
First IAM Page is the location of the start of the IAM chain that tracks the object allocation.
To view the data we need to either click on the first page on the allocation map, or click on the First Page link in the Allocation Info table.
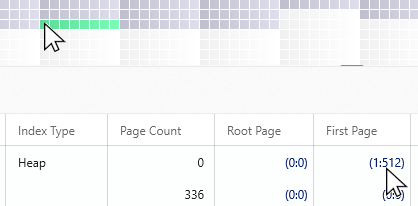
This will open up the Page in the Page Viewer.
Step 5 - Viewing the Page
The Page Viewer has three parts:
- Raw data displaying the 8192 bytes that make up the page in hexadecimal format.
- Page slots to switch to the different records on the page.
- Decoded information to show where on the page the various data structures are and how they can be represented.
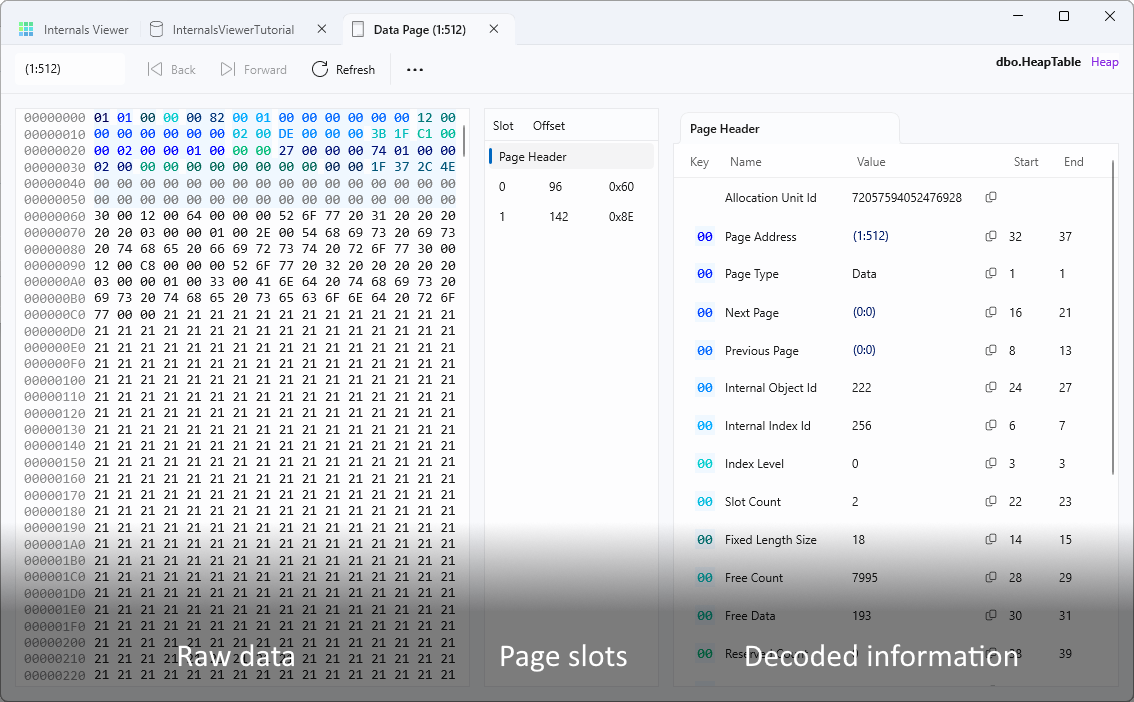
When the page first loads the Page Header is selected. See Page Header.
Clicking on Slots 0 and 1 displays the two rows that were inserted:
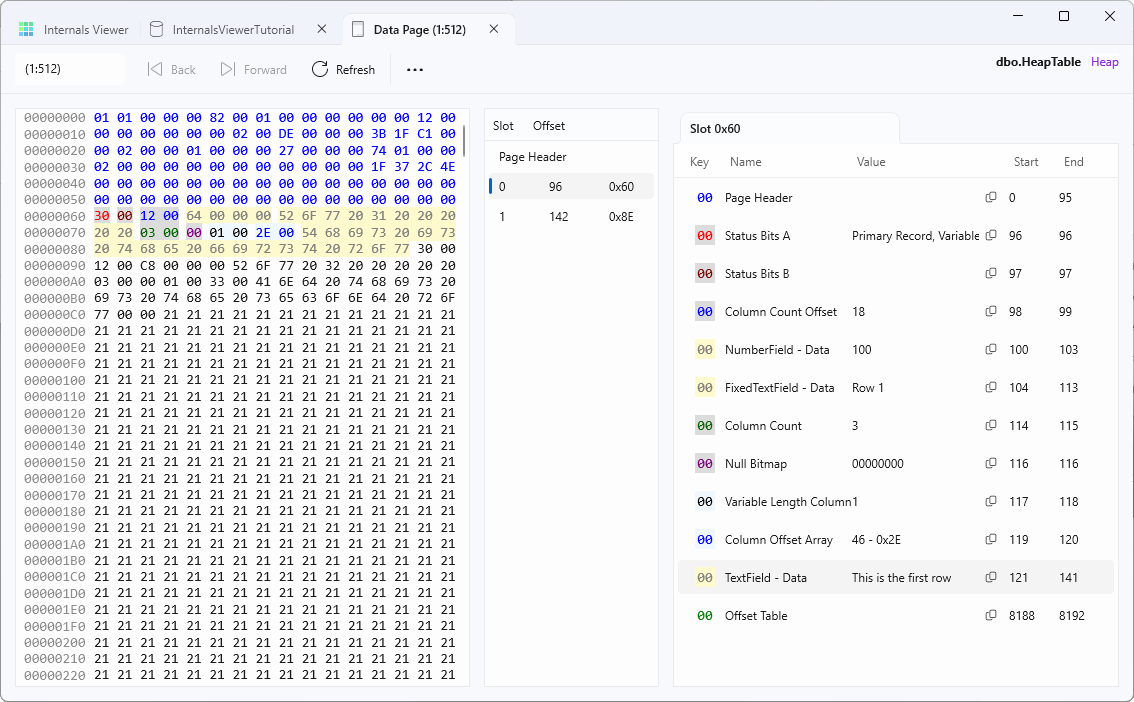
The raw data is colour coded to show where the different elements of the row are stored.
The decoded information shows a combination of fields the database uses to store information about the row, including things like Column Count and Column Count Offset and also the actual data, for example the value in column TextField.
Clicking on an item in the decoded information will highlight where it is in the raw data.
Selecting bytes in the raw data will show a decode for the data selected represented in various applicable data types.

Next add more rows via SQL
WHILE @RowNumber <= 100
BEGIN
    INSERT INTO dbo.HeapTable
    VALUES
    (
        100 + @RowNumber
       ,FORMAT(@RowNumber, 'This is row 0')
       ,FORMAT(@RowNumber, 'Row 0')
    )

    SET @RowNumber += 1
END
Press the Refresh button to refresh the page.
There should now be more entries in the Page slots table and the new rows should be visible:

Step 6 - Linking pages
We haven't yet filled the page with data.
Clicking on Page Header in the Slot Offset Table will select the Page Header and display the decoded values.
Slot Count tells us the number of records that are stored in the page - 102 (2 inserted initially and 100 inserted through the above step).
Note Free Count and Next Page. Free Count corresponds to the number of free bytes in the data page so it's about 50% full. Next Page is (0:0) meaning we don't have a next page yet.
Add more rows to